
Premiere project setup
The end-to-end editing guide for the video team. It covers opening a production, configuring Premiere, importing assets, building the timeline, the After Effects round-trip, audio, and export. Review happens in the shared Iconik Review Process; file and folder naming live in Reference.
1. Open the production
Section titled “1. Open the production”- Connect to the Lucid
video-working.wacfilespace. - In Premiere, choose
File > Open Production, then browse toLucid > production > year > production_name. - Always open via Premiere’s Open Production menu. Never open a production by double-clicking files in Explorer or Finder.
2. Set the scratch disk
Section titled “2. Set the scratch disk”In Premiere, open File > Project Settings and set the scratch-disk paths to
Lucid > adobe > year > scratch_disk.
3. Match preferences
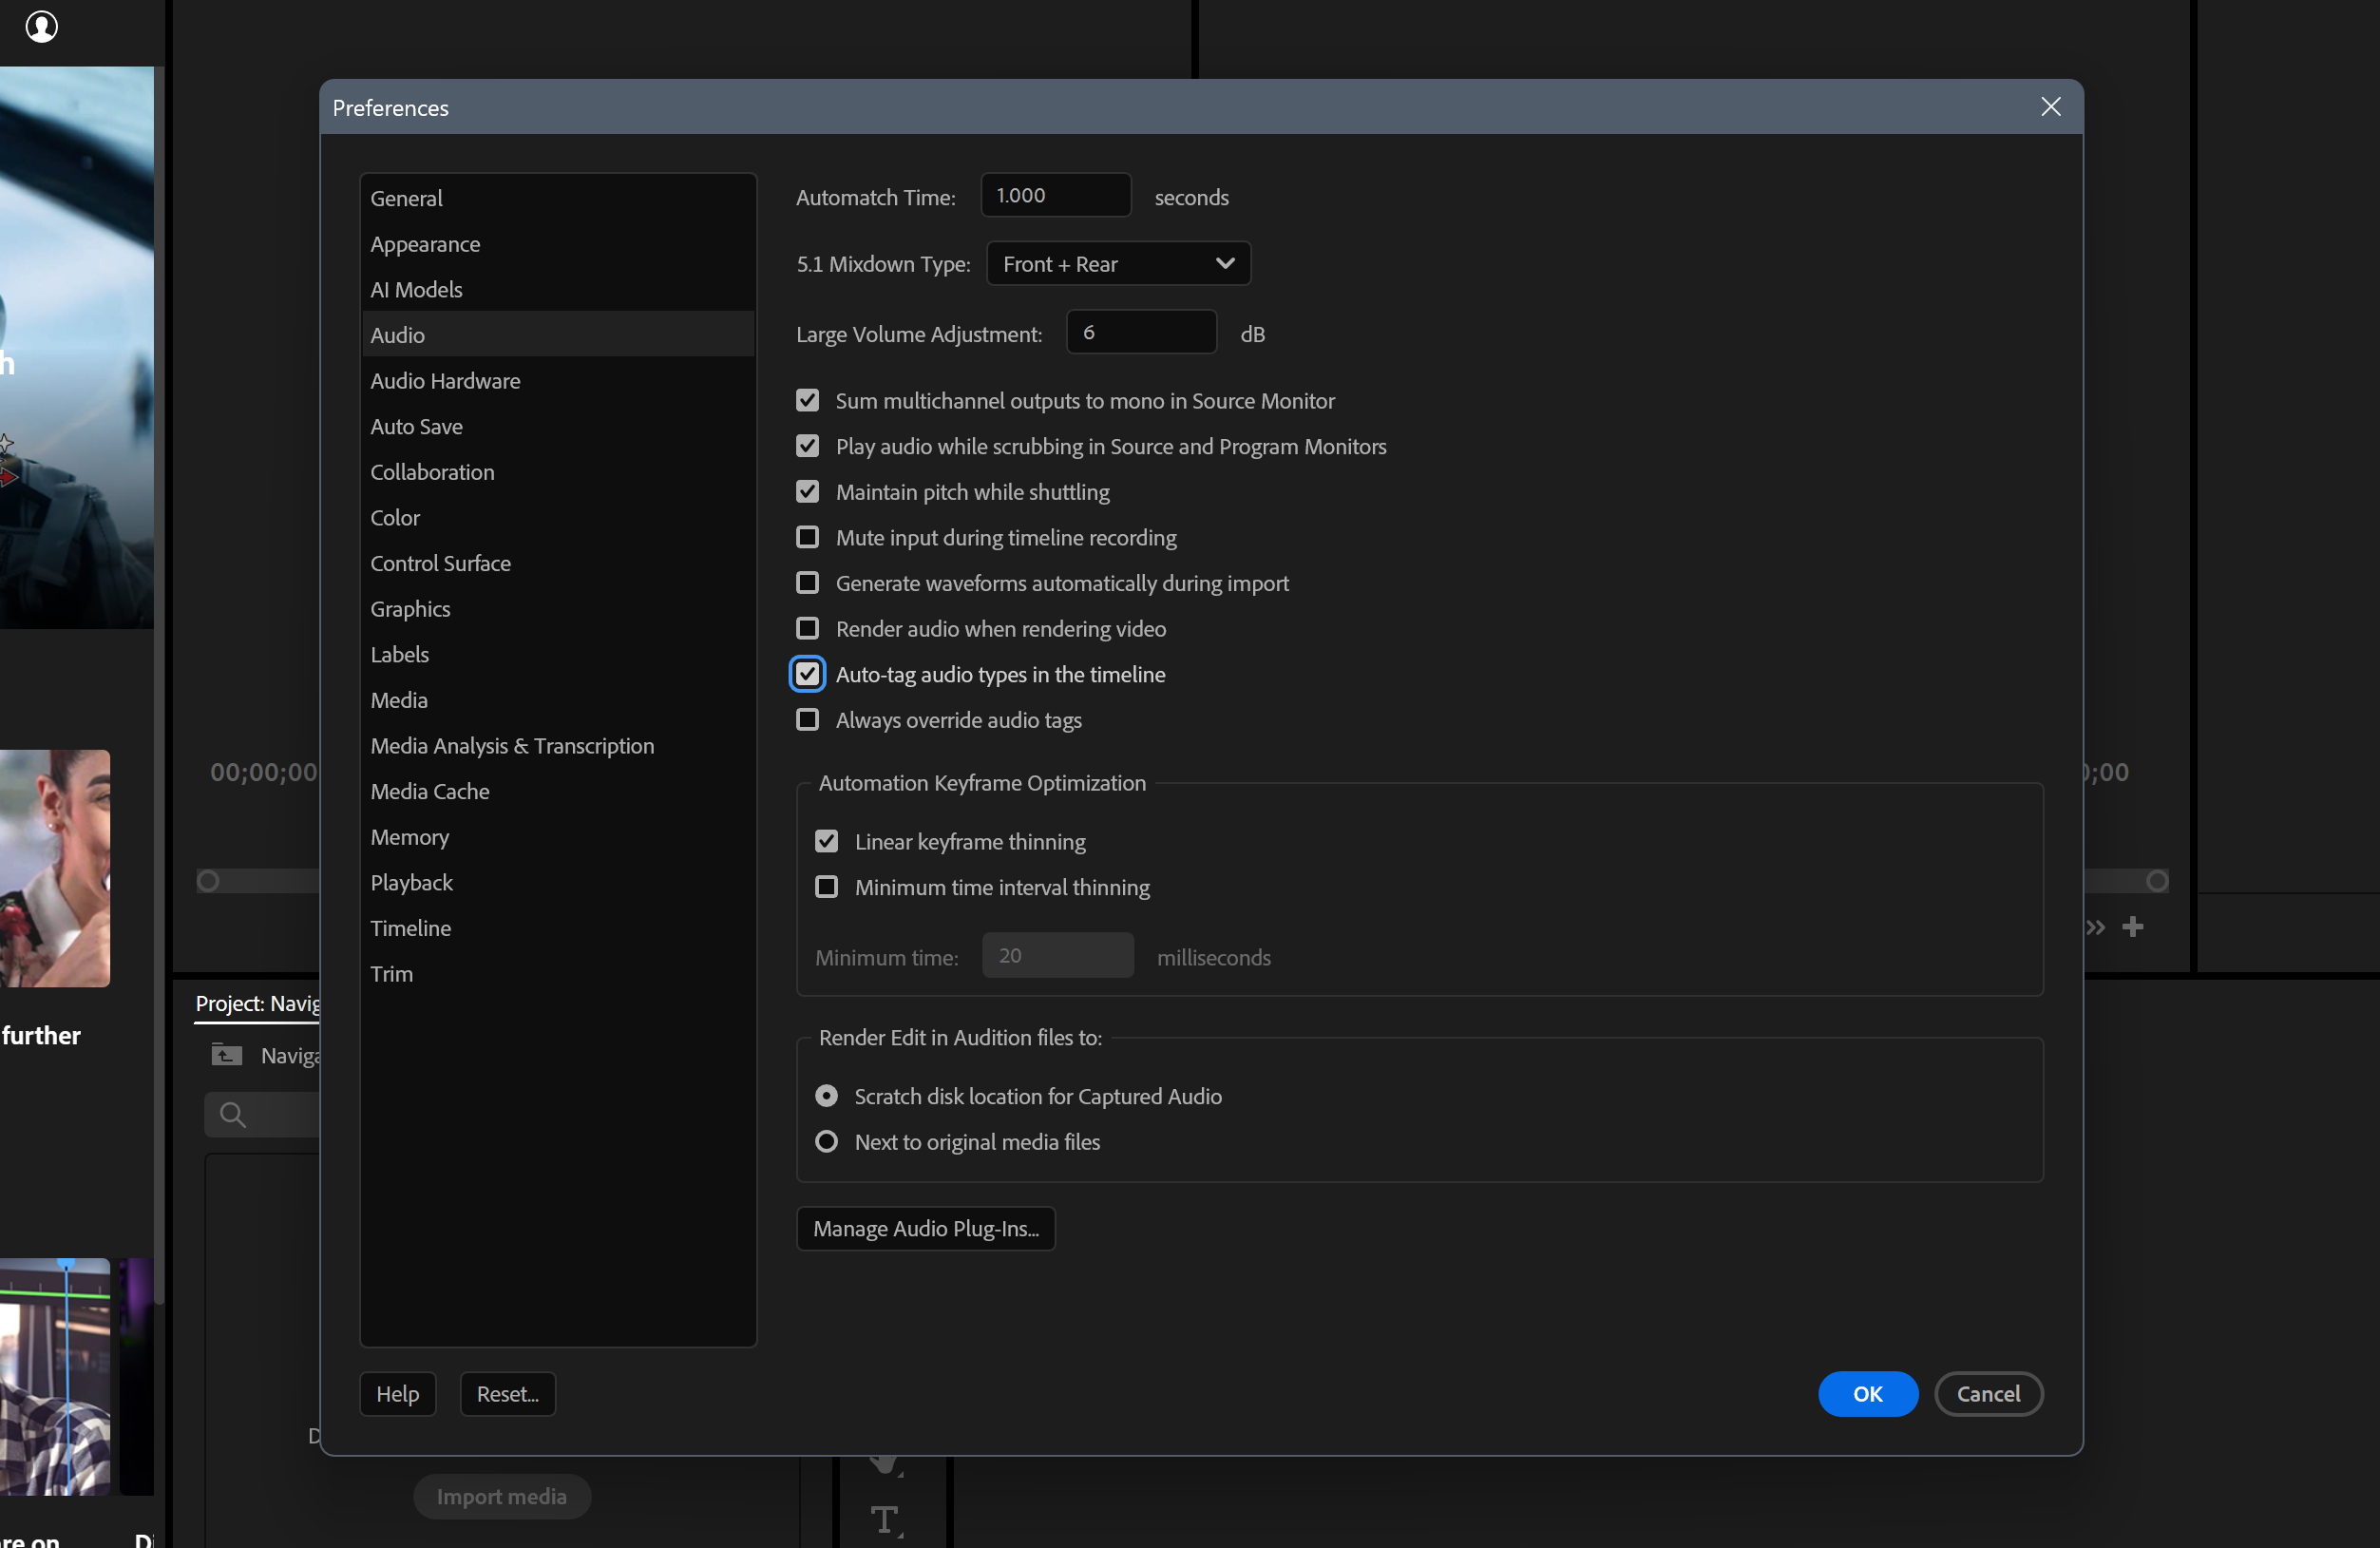
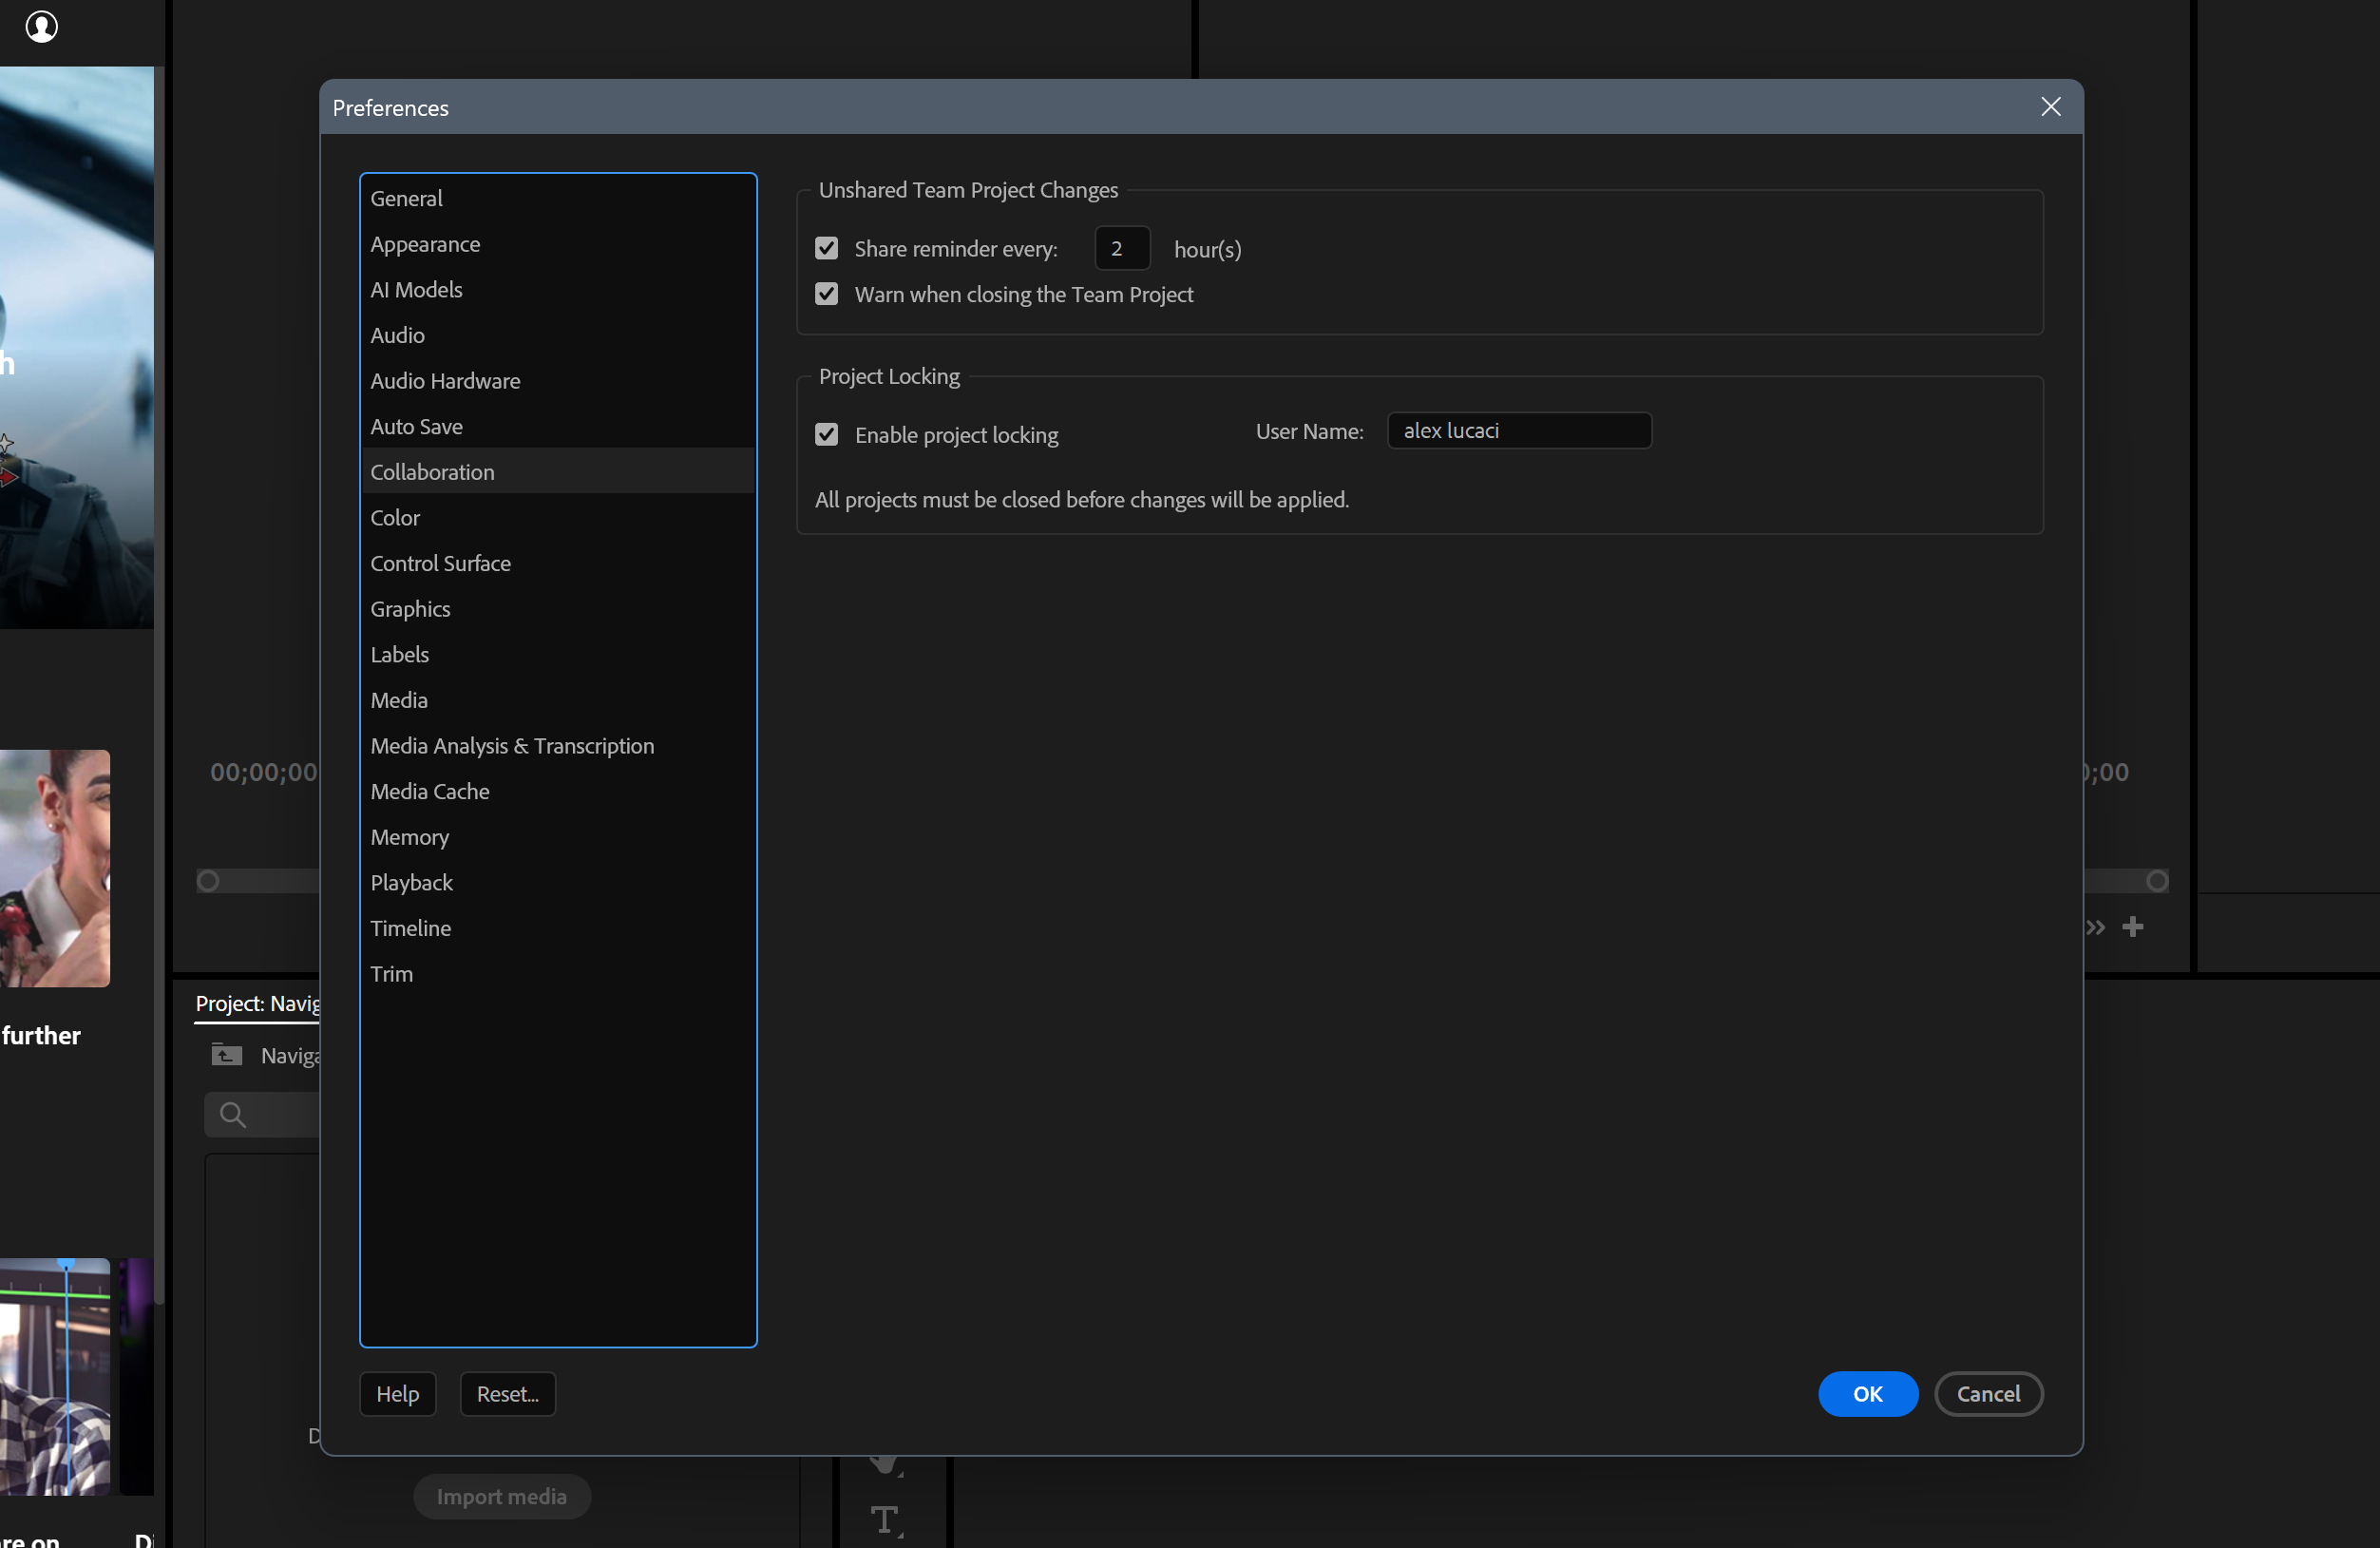
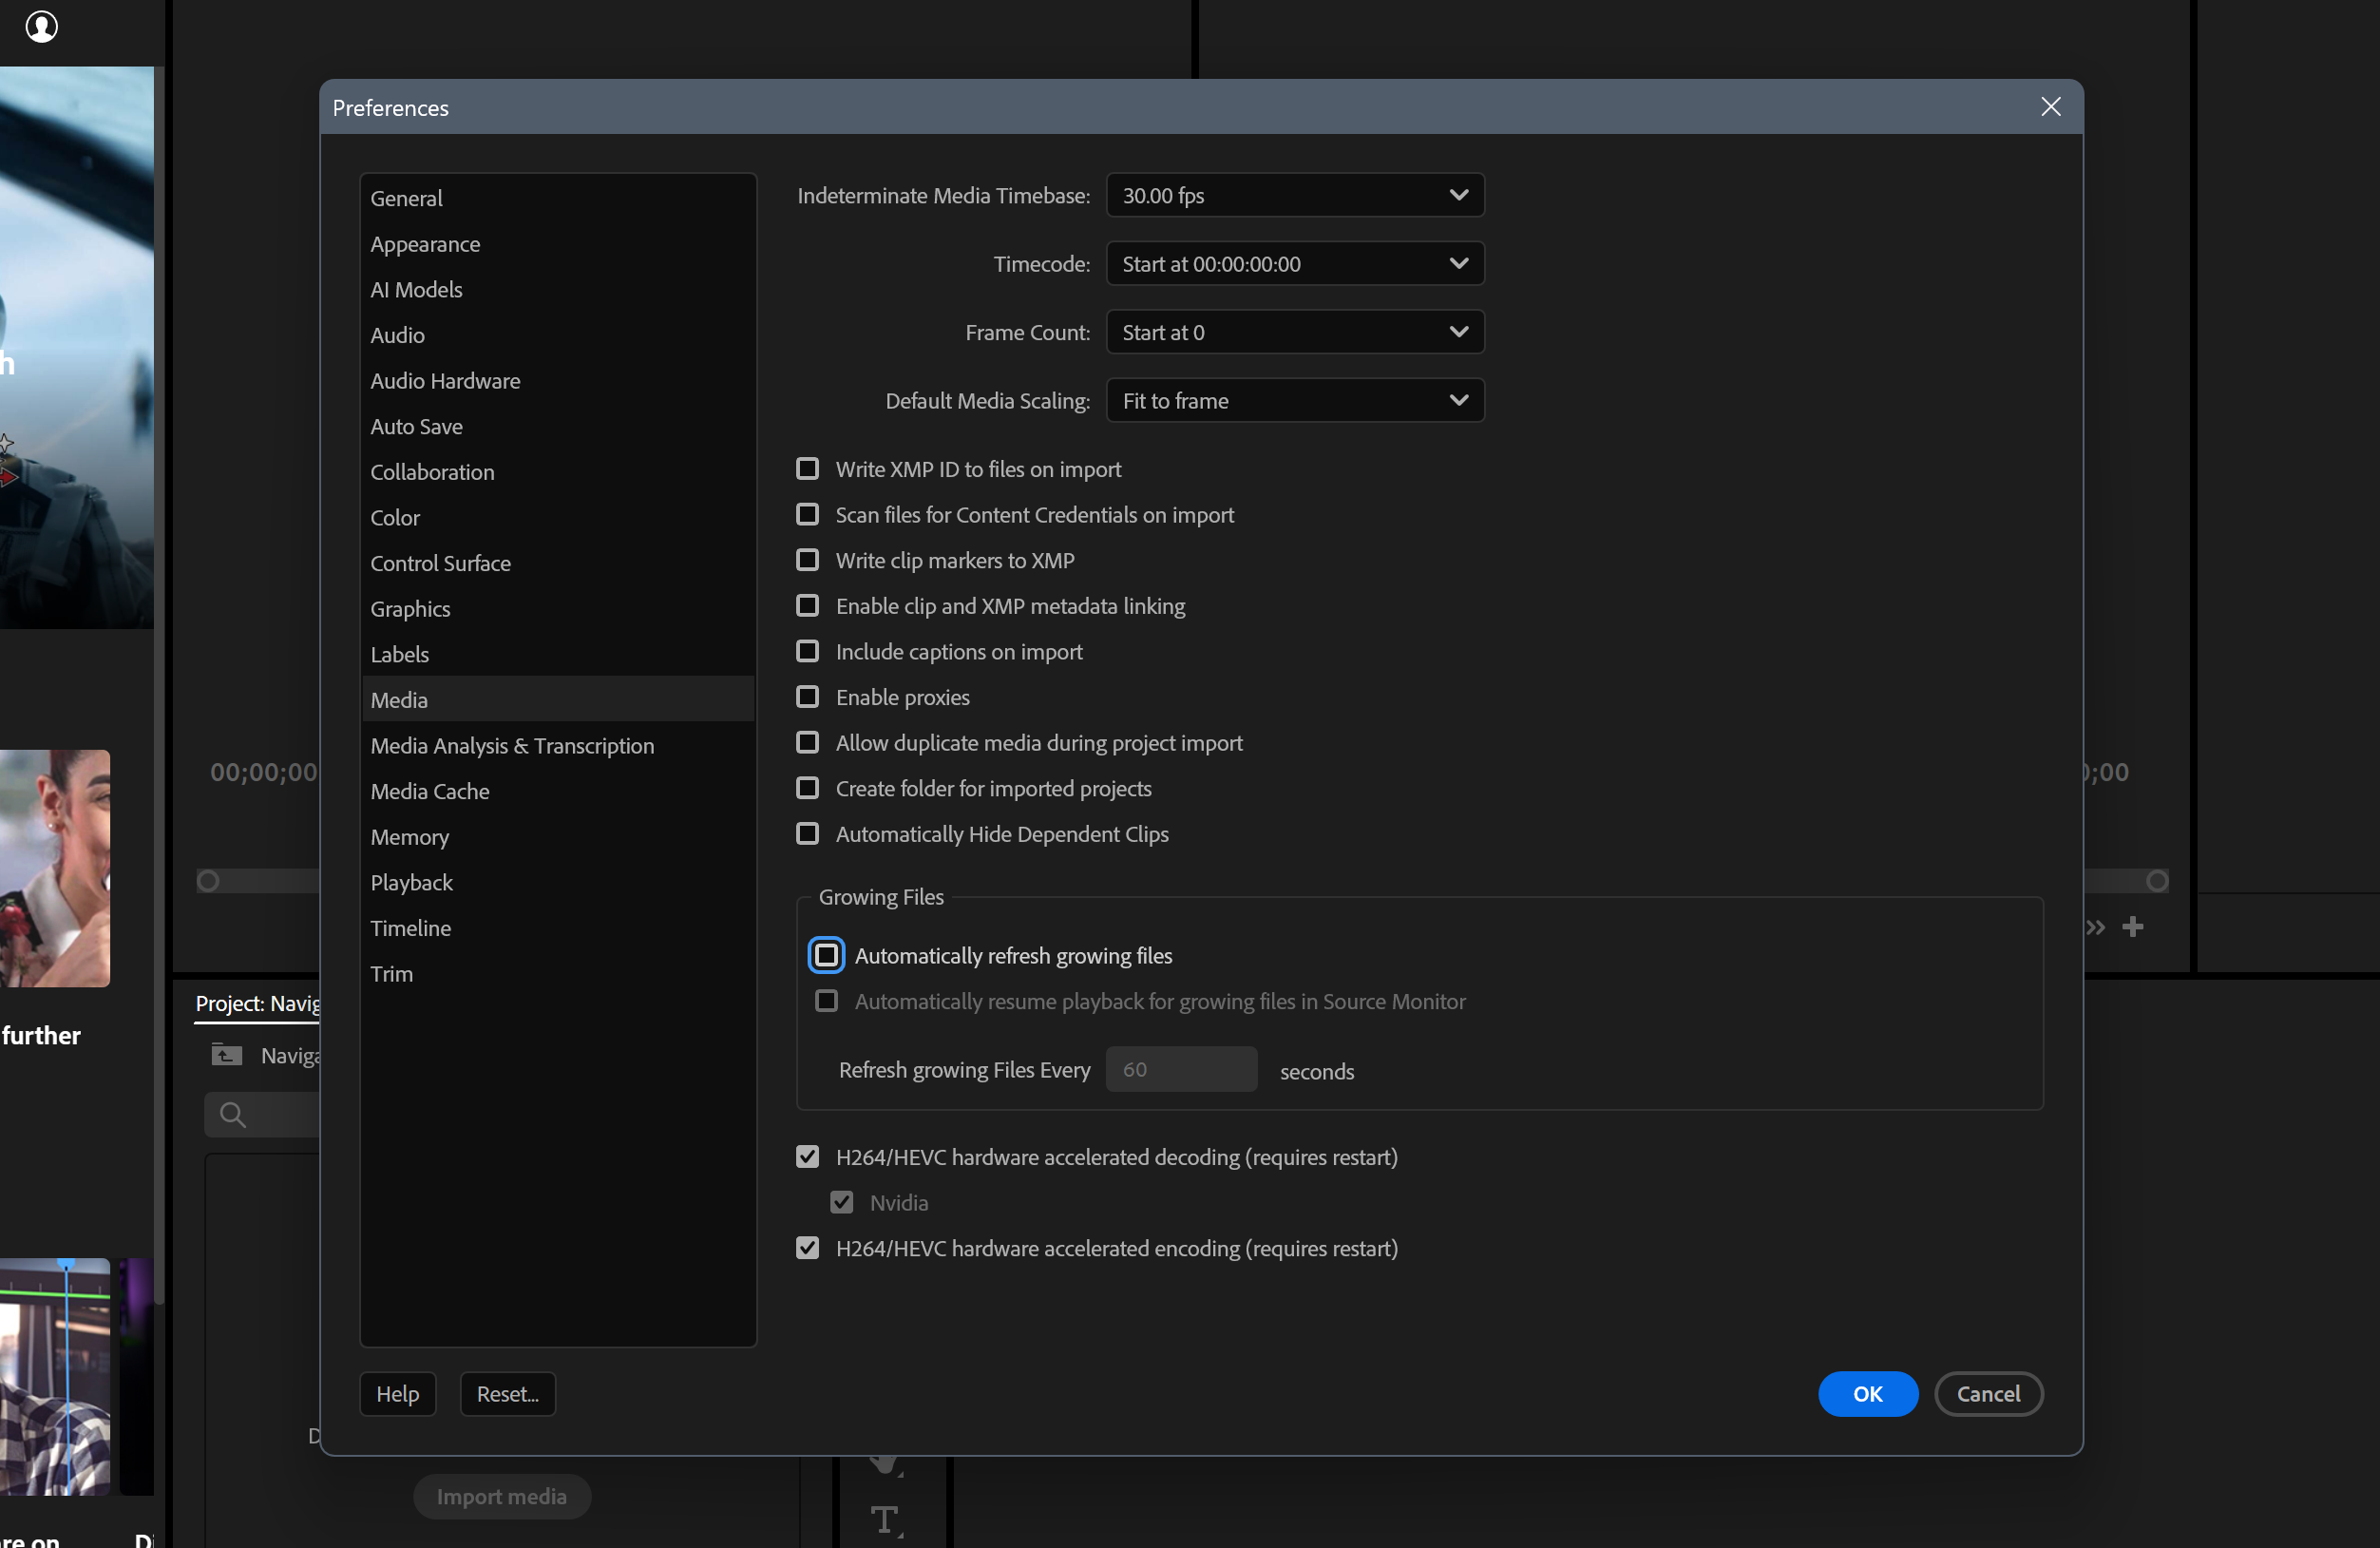
Section titled “3. Match preferences”Open Edit > Preferences and match the reference settings for each section.
-
Audio - match the reference audio settings.
-
Collaboration - enable project locking and add your lowercase username.
-
Media - untick all boxes as shown.
-
Media Cache - point cache files to
Your SSD > disk_cache > media_cache.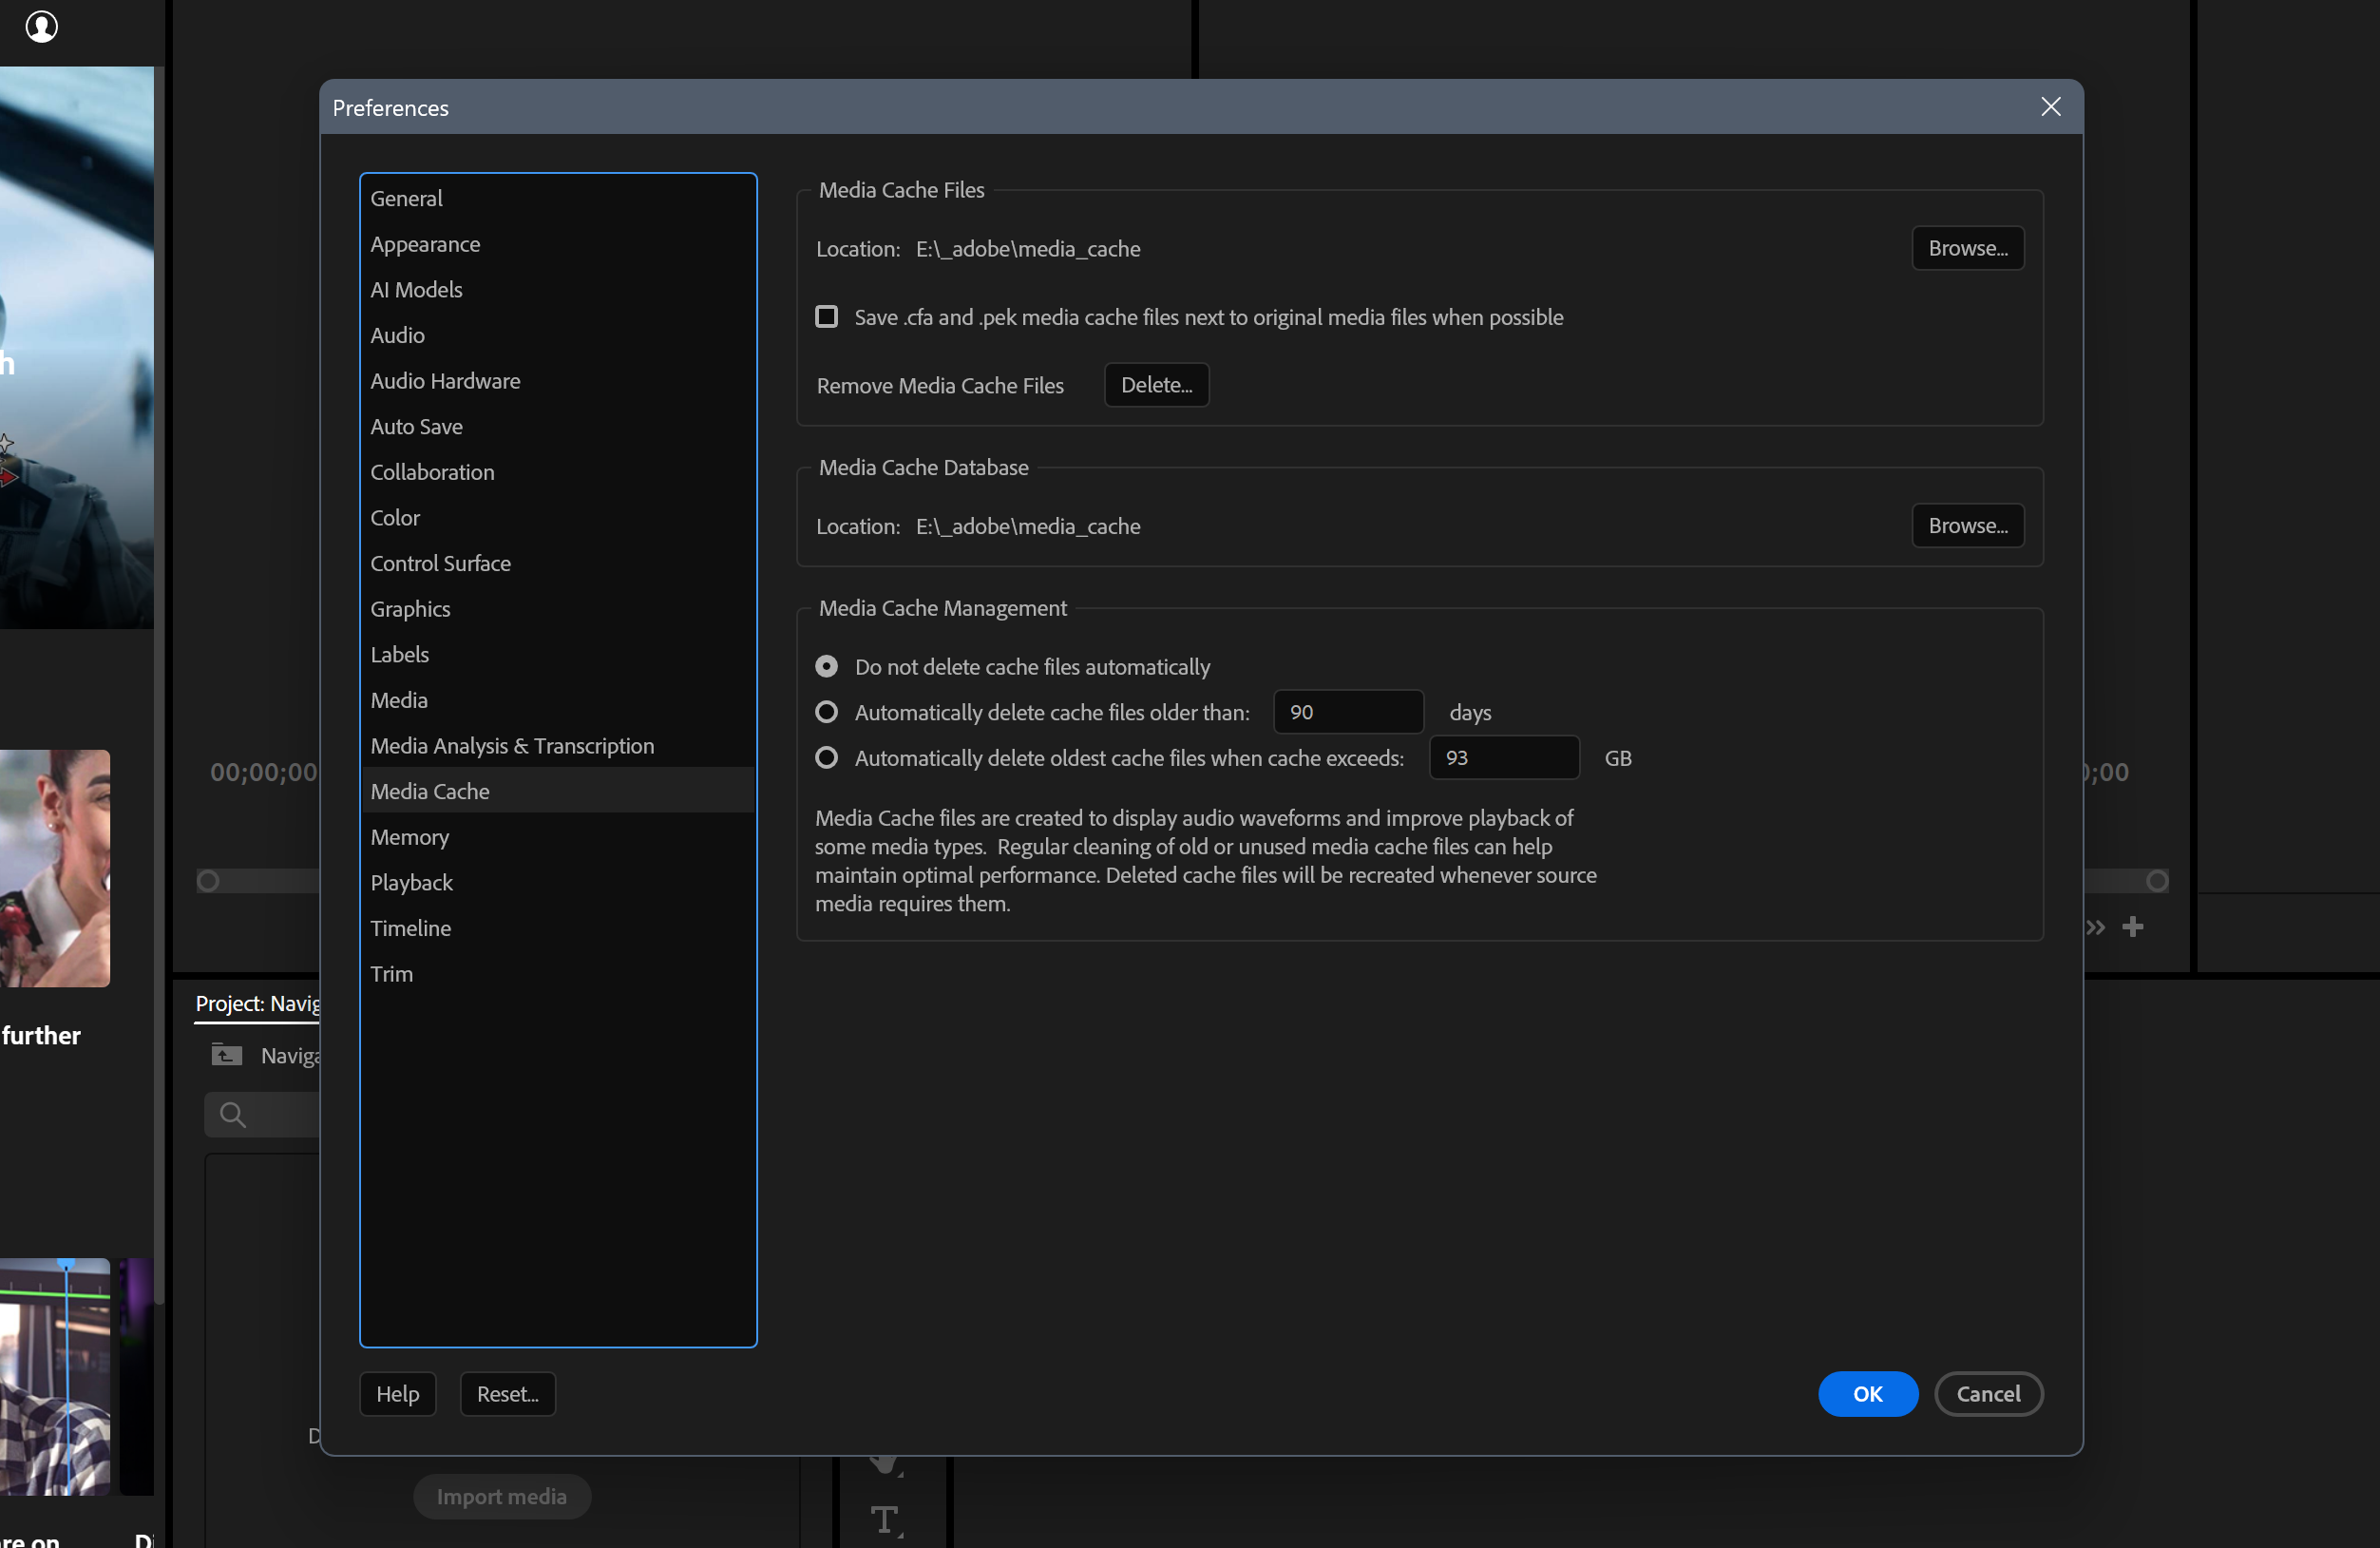
-
Disable importing coworkers’ workspaces - in
Window > Workspaces, untick Import Workspace from Projects.
4. Import assets and MOGRT templates
Section titled “4. Import assets and MOGRT templates”The asset bin holds the MOGRT overlays.
- To register the shared templates, open the Essential Graphics panel, click the hamburger menu, choose Manage Additional Folders > Add, select the shared templates folder, and confirm with OK.
- For brand-specific MOGRTs, browse to
assets > brands > [brand] > [product_type] > mogrts. - Always update the MOGRT fonts to match the brand (see Fonts).
5. Folders and footage placement
Section titled “5. Folders and footage placement”A production file is a container for all assets related to that project. Footage lives
under the per-SKU 01_footage directory, which holds the automation-linked crew
folders /amc, /usa, /cgi, and /360.
Inside each crew folder:
- First-round footage goes in the existing
first_shootsubfolder. - Reshoots go in a new
rs01folder alongsidefirst_shoot; additional reshoots arers02,rs03, and so on. - Unusable footage goes in an
_oldfolder to keep the workspace clean.
CGI assets live directly under /cgi and follow their own animation naming format.
For the full layout and the case-study / live-footage locations, see Folder structures. For every filename pattern, see Naming conventions.
6. Timeline color coding
Section titled “6. Timeline color coding”Color-code clips by element so the timeline reads at a glance:
| Element | Color |
|---|---|
| Dialogue / VO | Iris |
| Footage PW or audio-synced | Iris |
| Footage AMC or no audio | Violet |
| Nest | Forest |
| Images | Lavender |
| Dynamic Link | Rose |
| Animation / CGI | Magenta |
| Music | Caribbean |
| VO punches / SFX | Cerulean |
| Outros / Intros | Blue |
| Motion BG | Teal |
| Adjustment layer | Yellow |
| Solids | Brown |
| Project bins | Mango |
7. Fonts
Section titled “7. Fonts”Brand fonts live in assets > fontfaces > [brand]. Use the correct face per brand:
| Brand | Font |
|---|---|
| WAC | Myriad Pro |
| Modern Forms | Walkaway Bold |
| dweLED | Museo Slab 500 |
| AiSPIRE | Open Sans |
| Schonbek | Century Old Style Std |
| Schonbek Forever | Futura PT Light |
Contact a graphic designer for font questions.
8. Intros, outros, and transitions
Section titled “8. Intros, outros, and transitions”- Start - open with a slow 2-second fade-in plus a smooth zoom-in.
- Music timing - bring music in 1 to 1.5 seconds before the VO.
- Transitions - use a dip to black between shots; reserve hard cuts for interviews or presentations only.
- Brand fades - Modern Forms always fades to black; other brands fade to black, or to white if the background is bright.
- Chyron - place bottom-left by default, sized per spec.
Outros: end on a product shot fading to black, avoid zooming out on the last shot, and sync the VO product name with the on-screen text.
9. After Effects: dynamic links and Render & Replace
Section titled “9. After Effects: dynamic links and Render & Replace”New AE project
Section titled “New AE project”Open the AE template at
adobe > templates > after_effects > ae_project_template_2025.aep.
Sending clips to After Effects
Section titled “Sending clips to After Effects”- Duplicate the clip directly above the original in the Premiere timeline.
- Right-click the duplicate and choose Replace with After Effects Composition. The clip turns Rose.
- Save the dynamic-link AE project at a path relative to your project:
video-working/media/year/brand/type/sku/project_files/after_effects/dynamic_links. - Name the AE project per the
After Effects naming pattern, e.g.
pd25516-bk-ab_20240527_nlg_stab_sh01_v01.aep.
Not every clip is a dynamic link. Save a regular AE project under
.../project_files/after_effects/saved_files, using the same naming pattern.
Exporting clips from After Effects
Section titled “Exporting clips from After Effects”Output paths are relative to the project and always inside ../03_vfx/. The
pd25516-bk-ab_20240527_nlg_stab_sh01_v01.aep example renders to
video-working/media/2025/modern_forms/luminaires/pd25516-bk-ab/03_vfx/, into bins
such as dynamic_links, ae_rendered, or gen_ai. Create new bins inside
../03_vfx/ as needed for new asset types (for example gen_ai for generative AI or
Topaz-upscaled videos).
Render & Replace and revisions
Section titled “Render & Replace and revisions”- After the AE work, in Premiere right-click the AE clip and choose Render & Replace.
- Set the export: format QuickTime, preset Apple ProRes 422 LT or 4444 (alpha), destination the dynamic_links folder, handles 30 frames.
- The clip turns Violet; move it to its shot-type folder.
- For revisions, restore the unrendered clip, edit in AE, save, then re-render.
10. Motion graphics
Section titled “10. Motion graphics”- Alternate left-to-right and right-to-left text MOGRTs across multiple lines.
- Avoid placing text over the product.
- Balance font size for smartphone viewing.
- Always add a slow push-in animation.
- Use the prescribed specs for finishes and color temperatures.
- Organize nests by type (for example sound effects, color temp).
- For time remap plus stabilization, stabilize first, then remap the nest.
11. Voiceovers and audio
Section titled “11. Voiceovers and audio”- Clean the VO: remove clicks, pops, breaths, and similar artifacts.
- Add 4-frame crossfades at cuts.
- Pull music from Storyblocks; gain music to between -24dB and -18dB; keep VO between -4dB and -2dB.
- Fade music slowly and keep 1 second of silence on black before a cut.
- Use
usedandunusedbins to track music usage.
12. Export and deliverables
Section titled “12. Export and deliverables”- Edit timelines at 30fps; interpret AMC 50fps footage down to 30fps. Animations are often 24fps - adjust accordingly.
- Use the provided export presets.
To build deliverables:
- Duplicate the latest approved sequence and clean the timeline.
- Nest the motion graphics as a single layer.
- Duplicate the cleaned sequence into two versions: with and without the CTA outro.
- Rename the sequences:
modelNumber_productName_cta(with CTA) andmodelNumber_productName(without CTA).
13. Review and delivery
Section titled “13. Review and delivery”Exports flow into the shared Iconik Review Process. LucidLink mirrors uploads to Iconik automatically, transcoding generates a share link, and the link pushes to the Monday Product Planning board, which advances the SKU status and notifies the team - all automatically. Do not duplicate that process here; see the Iconik Review Process for the full review cycle and reshoot handling.
Final approved deliverables land in
media_files > year > deliverables > brand > product_type > sku.
Naming and folders
Section titled “Naming and folders”Naming and folder layouts are the single source of truth in Reference - do not copy the tables here:
- Naming conventions - footage, reshoots, live footage, After Effects projects (and shot-type codes), and final deliverables.
- Folder structures - the LucidLink layouts,
including
01_footageand the crew folders.